
How to Add Product Sizes, Colors, and Different Prices to an Order Form
Say you sell a cotton t-shirt in five sizes and three colors. The XXL costs a little more to make, so it should cost a little more to buy. You also sell a hoodie in two quality levels and sneakers in a basic and a performance version. That is dozens of product combinations, each with its own price.
You could make a separate order form for every version. But buyers would have to hunt for the right link, and you would have to manage several forms. A single online order form with product variations is easier for everyone. The buyer picks a size, color, and style from dropdowns, sees the correct price right away, and checks out once.
In this guide, you will learn how to add product sizes, colors, and different prices to an order form step by step. We will build a real example store with three products, set variant prices and stock, add shipping, connect a payment gateway, and share the finished form.
What Are Product Variations?
Product variations (or product variants) are the different versions of one product. Instead of listing “Black T-Shirt Size M” as its own product, you list one t-shirt and let the buyer choose the options.
- Size: S to XXL for the t-shirt, or US 7 to US 12 for the sneakers.
- Color: Black, White, and Navy Blue for the t-shirt.
- Style: Standard or Premium for the hoodie, Basic or Performance for the sneakers.
- Variation-based pricing: each combination can have its own price. In our example, the t-shirt costs $19 for S to L, $21 for XL, and $23 for XXL.
Each combination can also have its own stock count, SKU, and image. So when someone picks the navy t-shirt in XXL, they see a navy photo, the $23 price, and how many are left.
How to Add Product Sizes, Colors, and Different Prices Using PaymentForm.io
PaymentForm.io is a no-code payment form builder. It lets you create hosted order forms, checkout pages, donation forms, event tickets, and more, then share them with a link, an embed code, or a QR code. You do not need a website or an online store plugin to start selling.
PaymentForm.io handles the form and checkout. The actual payment is processed by the gateway you connect, such as PayPal or Stripe, so the usual gateway fees still apply.
For this task, we will use the Physical Product (Multiple) module. It is built for selling several physical products from one form. Each product can have its own variants, variant prices, stock, images, and SKUs, and buyers can add several items to one order.
Here is the example store we will build, called Thread & Stride:
- Premium Cotton T-Shirt: sizes S, M, L, XL, XXL. Colors Black, White, Navy Blue. Prices $19 (S to L), $21 (XL), $23 (XXL).
- Essential Pullover Hoodie: sizes S, M, L, XL. Colors Beige, Charcoal, Forest Green. Styles Standard ($39) and Premium ($49).
- Everyday Running Sneakers: sizes US 7 to US 12. Colors White, Black, Blue. Styles Basic ($59) and Performance ($79).
Step 1: Open PaymentForm.io and Click Create Form
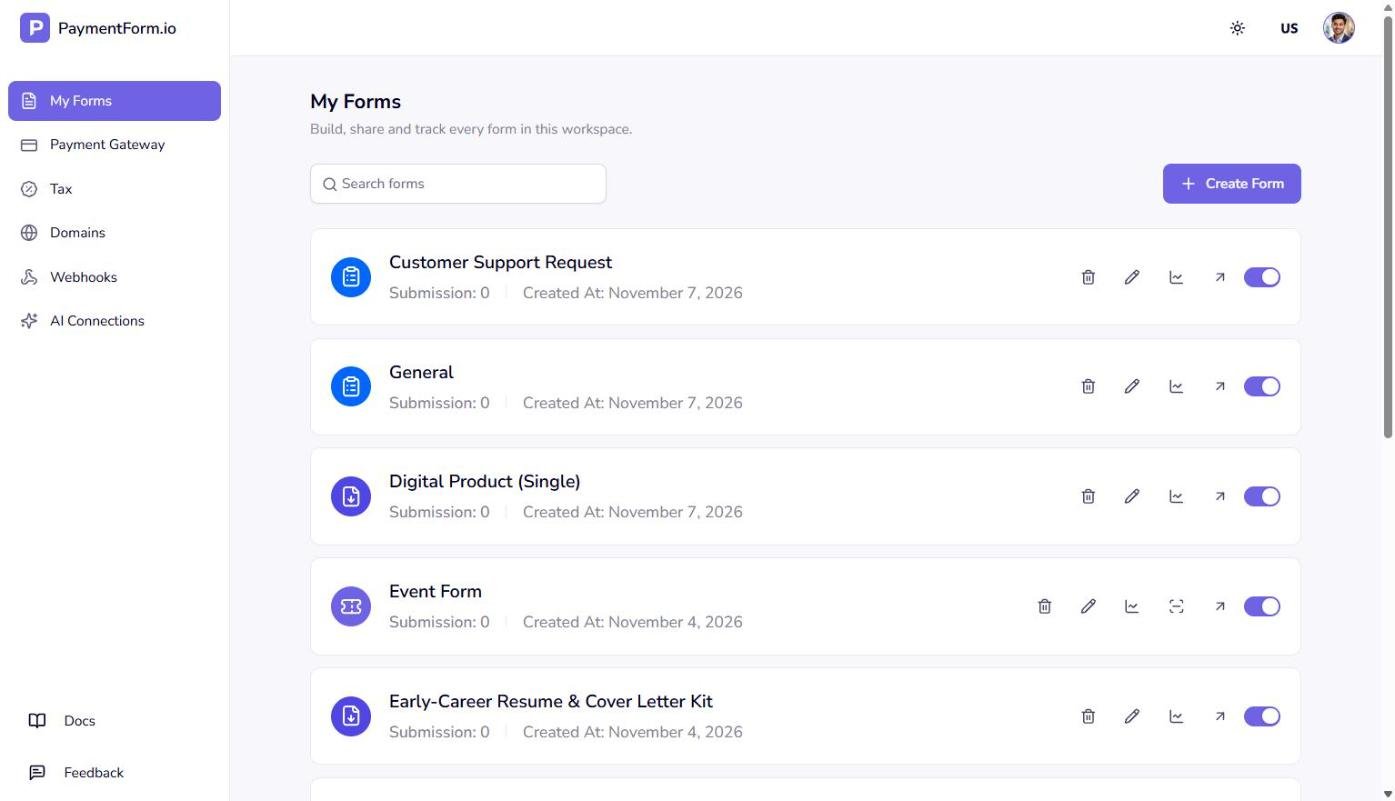
Go to app.paymentform.io and sign up or log in. After you log in, you land on the My Forms page. This is where all your forms are listed.
Click the Create Form button in the top-right corner.
Step 2: Select the Physical Product (Multiple) Module
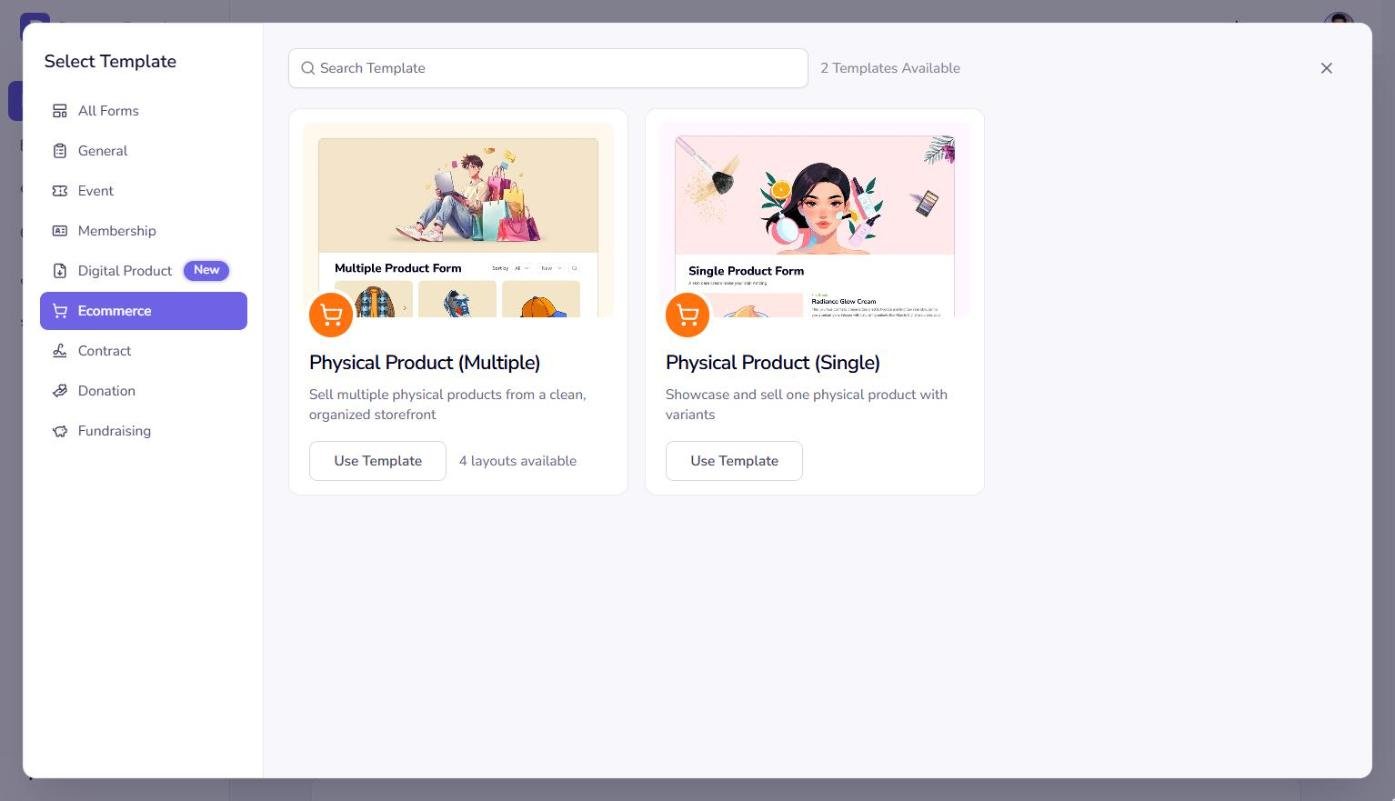
A Select Template window opens. In the left menu, click Ecommerce. You will see two templates:
- Physical Product (Multiple) for selling several products from one form.
- Physical Product (Single) for showcasing one product.
Click Use Template under Physical Product (Multiple).
Step 3: Choose a Form Layout
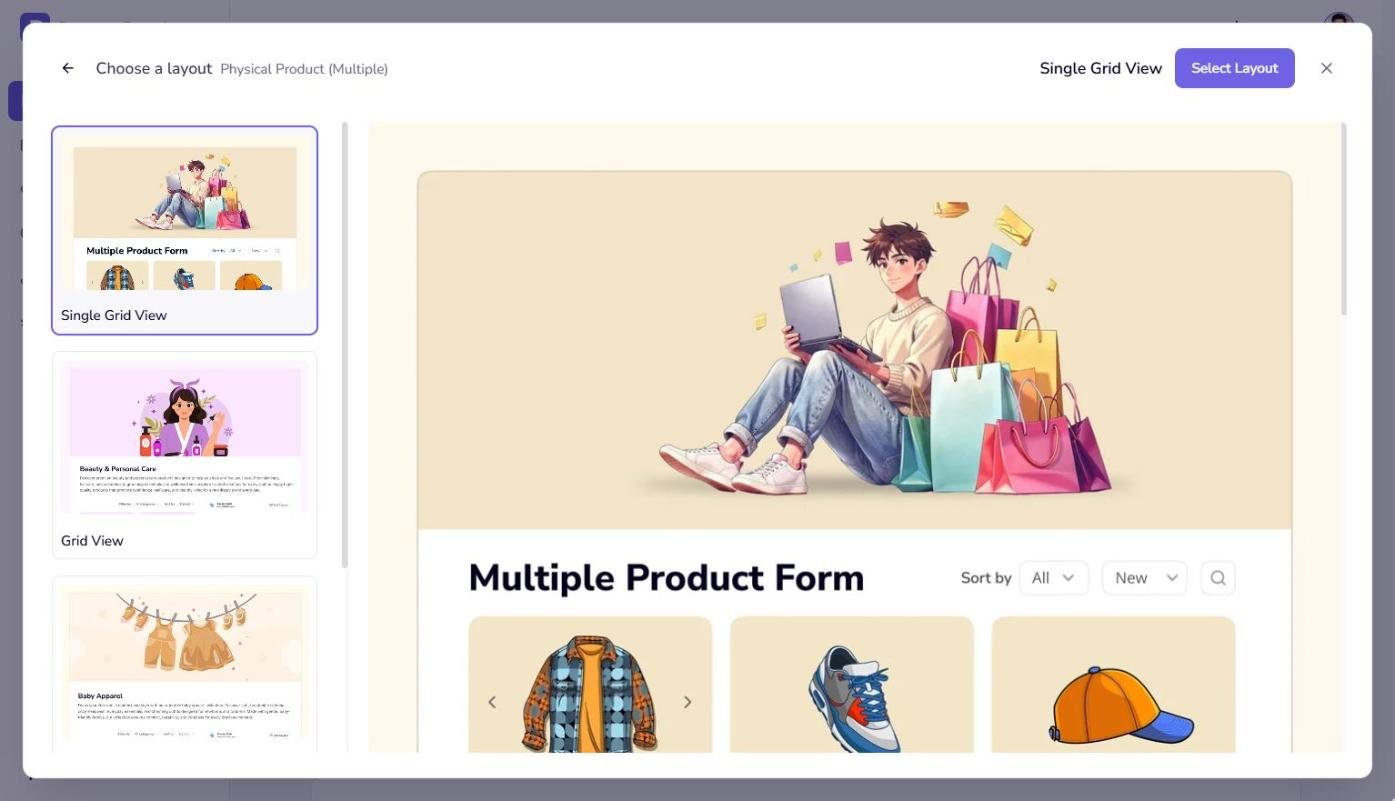
Next, you will see the Choose a layout screen. The left side lists the layouts, and the right side shows a large preview. For a clothing store, Single Grid View works well because it shows products as clean cards with their options.
Pick a layout and click Select Layout. You can change it later from Design > Layout in the editor.
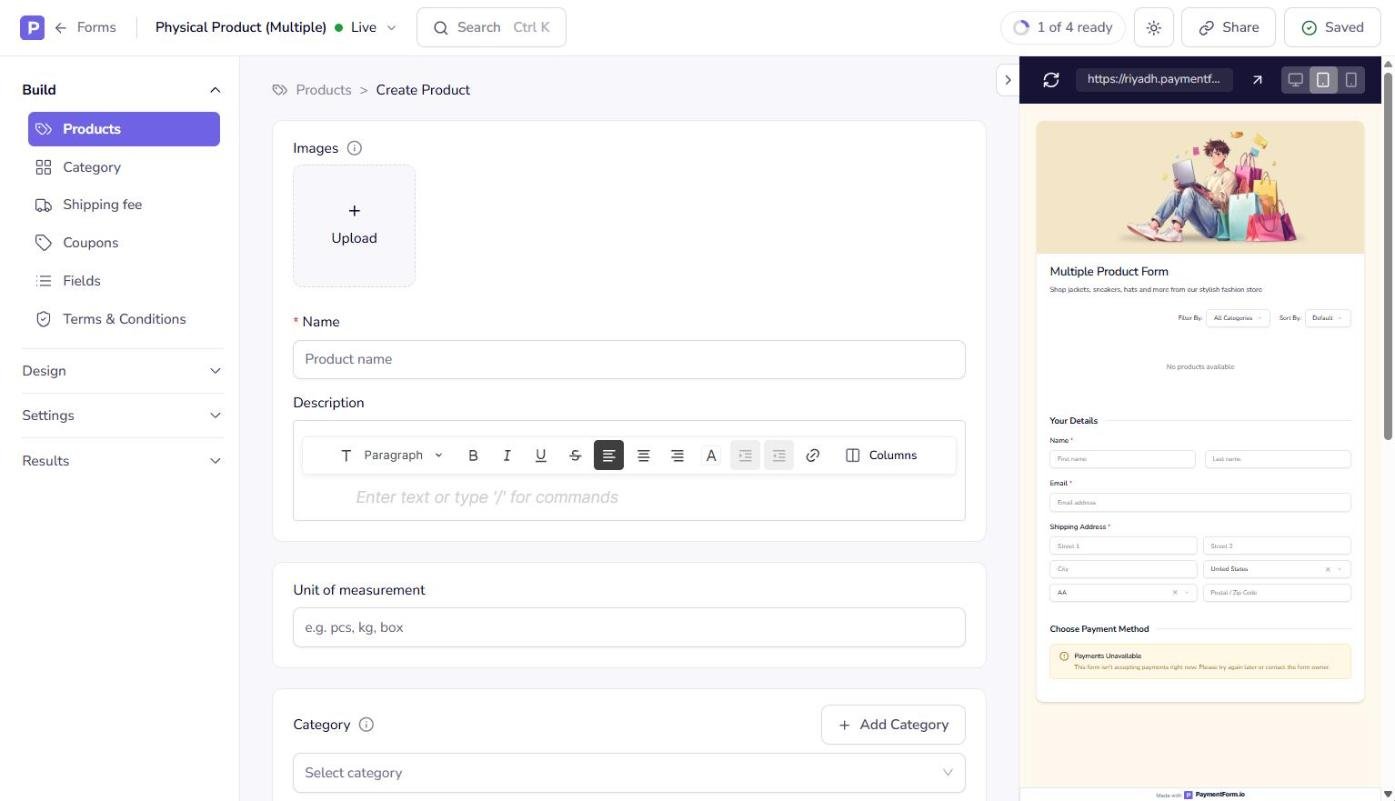
The form editor opens. The left menu has four groups: Build, Design, Settings, and Results. The right side shows a live preview of your form. The template also comes with a few sample products. Since we are adding our own, delete them by clicking the trash icon on each product card and choosing Yes.
Step 4: Create Your First Product
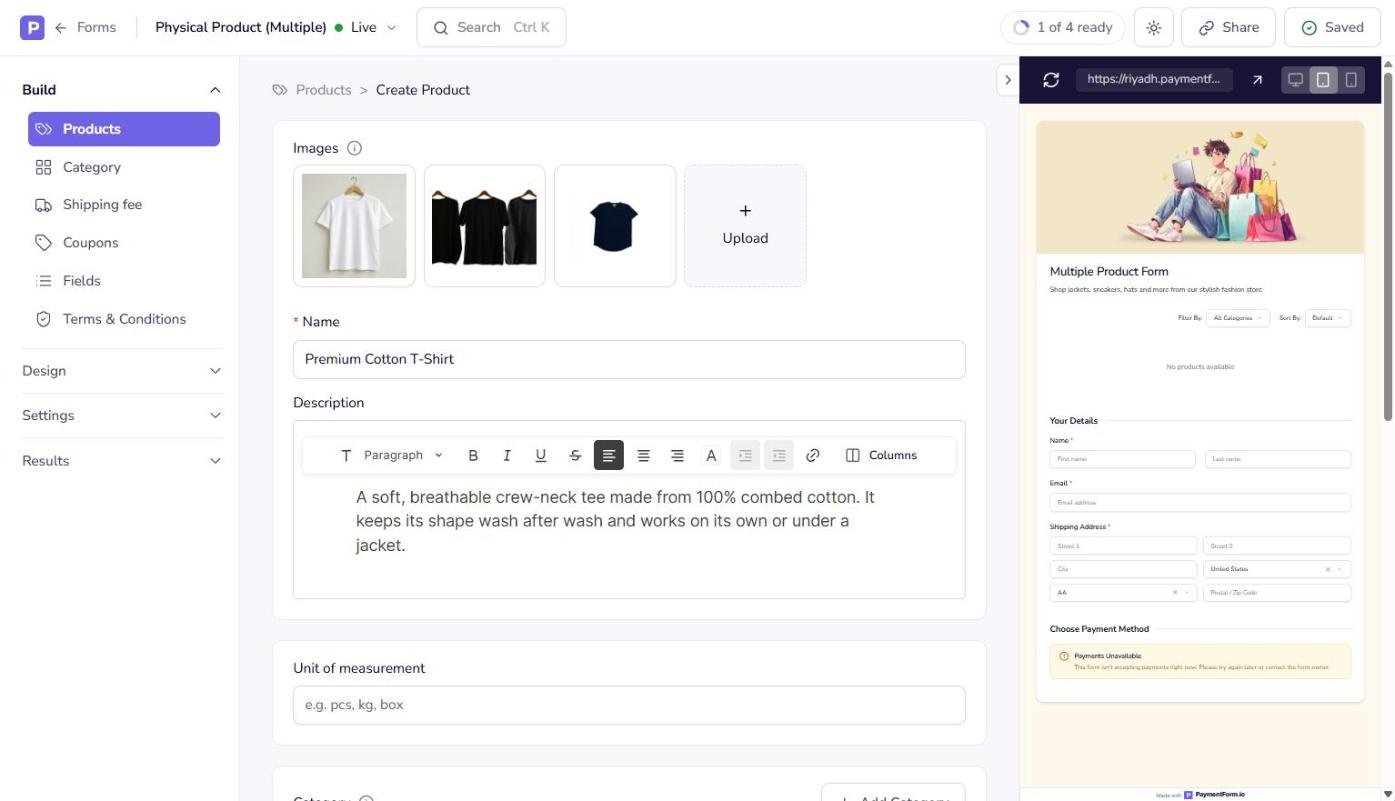
Go to Build > Products and click Create Product. This opens an empty product screen with sections for images, name, description, unit, category, variants, order limits, and pricing.
Step 5: Add the Product Name, Description, and Images
Fill in the basic product details:
- Under Images, click Upload and add your product photos. You can upload several images. Square photos work best, so try to use images around 700 × 700 px or larger.
- Type the product name in the Name field. We used “Premium Cotton T-Shirt.”
- Write a short Description. One or two sentences about the material and fit are enough.
- Add a Unit of measurement, such as pcs. For the sneakers, we used pair.
- Choose a Category. If you do not have one yet, click Add Category, enter a Category Name, and click Create. We used Clothing and Footwear, which lets buyers filter the form by category.
Step 6: Add Size Variations
Scroll down to Variants and click Add variant.
- In Variant Name, type Size.
- Click Add option and type the first size, such as S.
- Click Add option again for each remaining size: M, L, XL, and XXL.
- Click Done to save the variant.
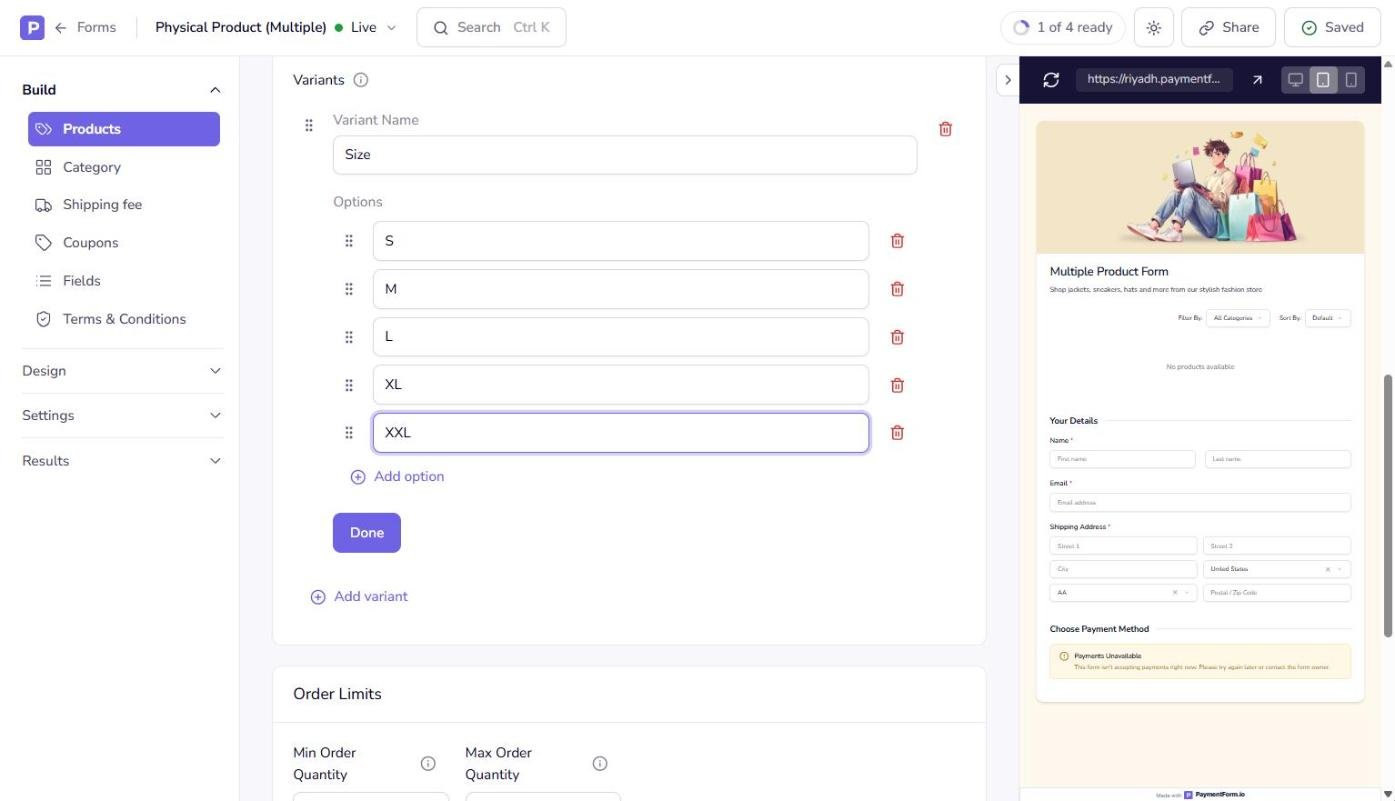
You can drag the handle next to each option to change its order, or click the trash icon to remove one.
Step 7: Add Color Variations
Click Add variant again. Name it Color, then add Black, White, and Navy Blue as options. Click Done.
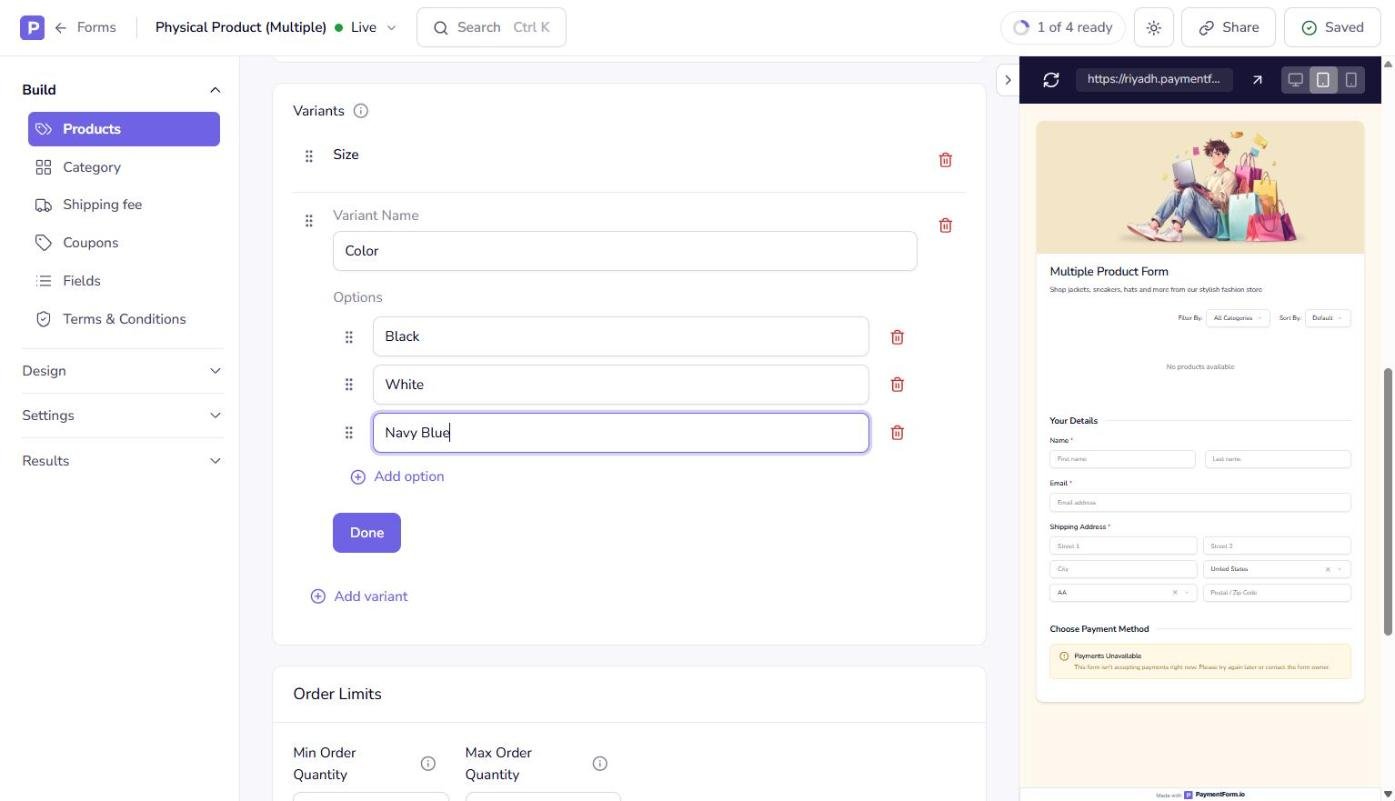
PaymentForm.io now combines both variants automatically. Five sizes and three colors give you 15 combinations, and each one can have its own price and stock.
Step 8: Add Style Variations
Some products need a third choice. Our hoodie comes in Standard and Premium quality, and the sneakers come in Basic and Performance versions.
For those products, click Add variant once more, name it Style, and add the style options. Click Done. The t-shirt in our example does not need a style variant, so we only added Size and Color to it.
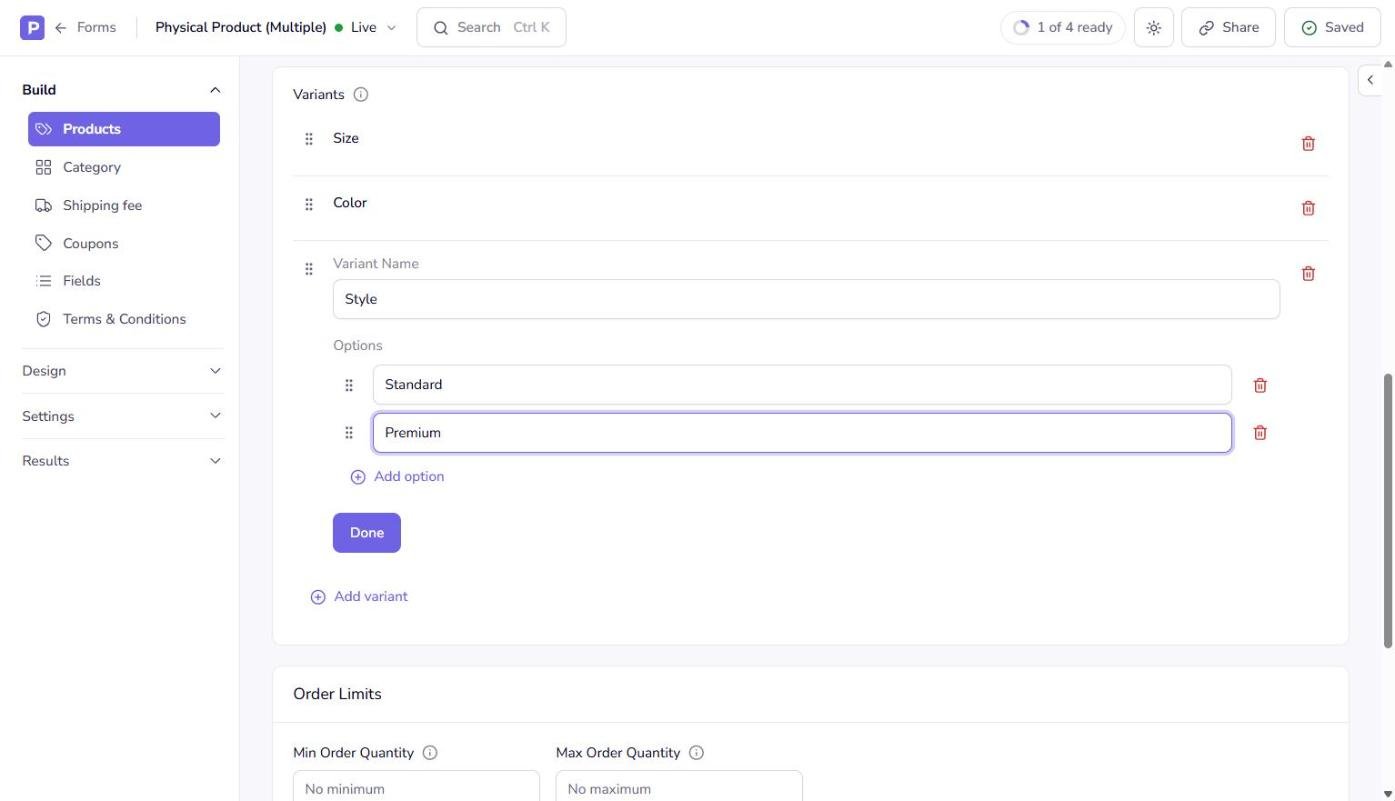
Below the variants, you will find Order Limits. Use Min Order Quantity and Max Order Quantity if you want to limit how many units one buyer can order. We set a maximum of 10 for clothing and 5 for sneakers. Leave both empty for no limit.
Step 9: Switch Pricing and Stock to Variant Mode
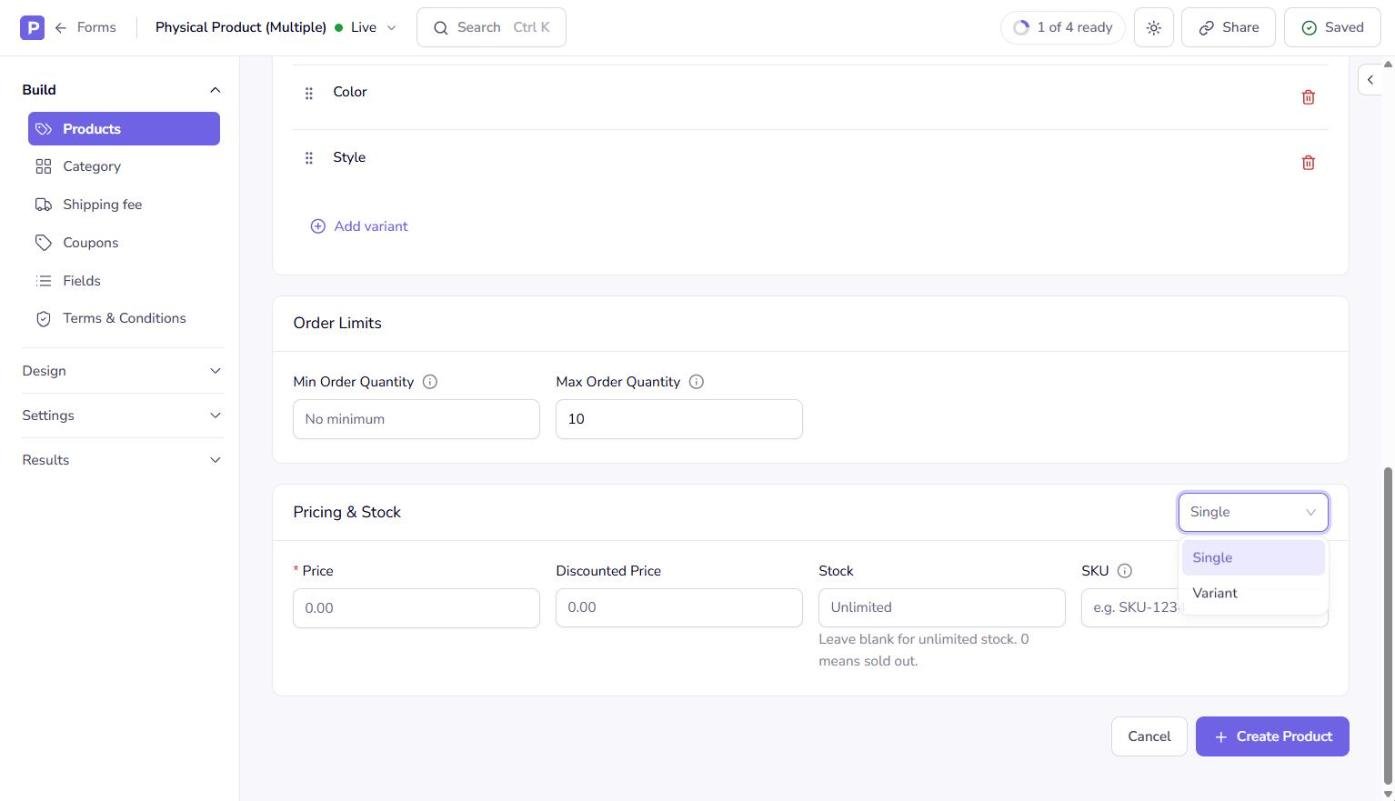
Scroll to Pricing & Stock. By default, it is set to Single, which means one price and one stock count for the whole product.
To give each variant its own price, open the dropdown on the right and choose Variant.
Step 10: Set Different Prices for Product Variants
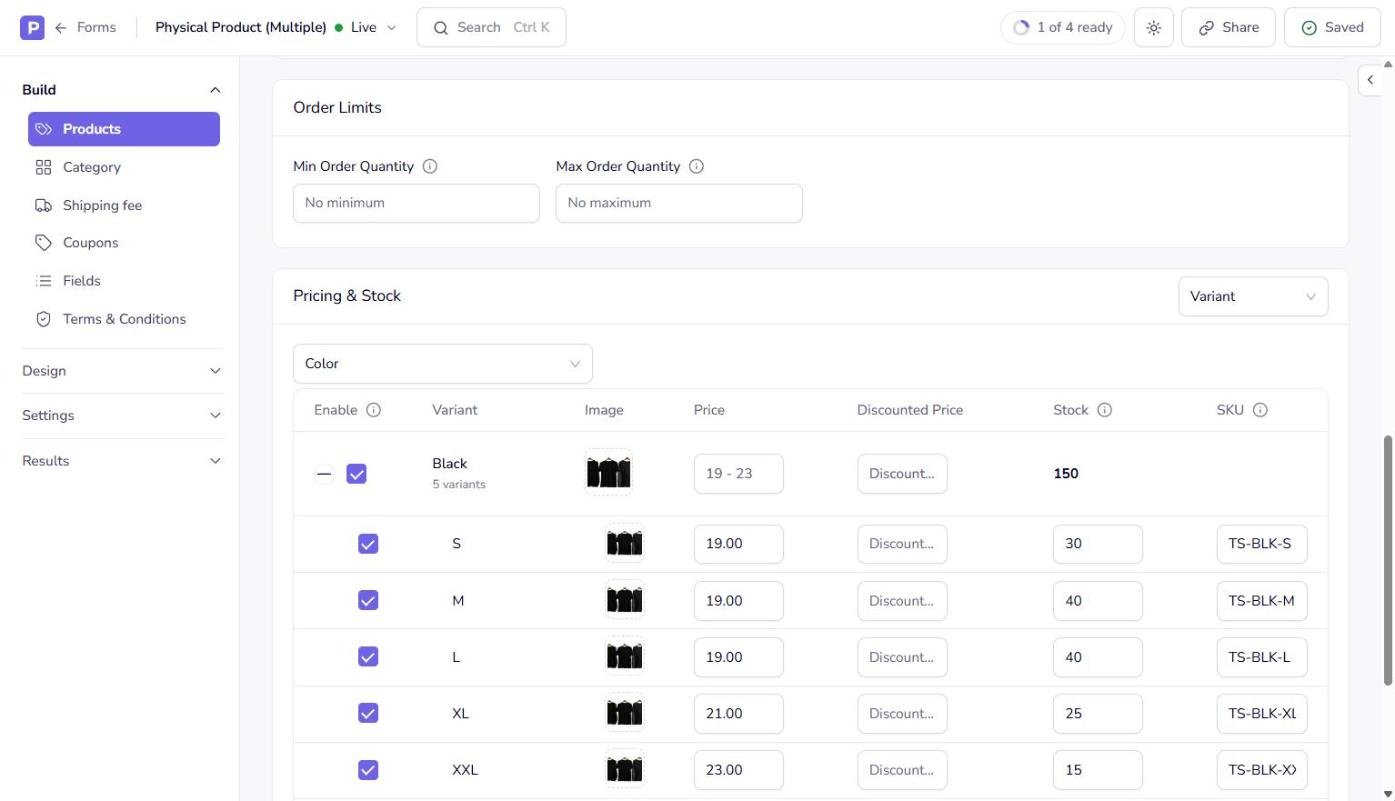
In Variant mode, you get a table with these columns: Enable, Variant, Image, Price, Discounted Price, Stock, and SKU.
The dropdown above the table lets you group the rows by any variant, such as Size, Color, or Style. This makes bulk pricing much faster:
- Group by Size to set size-based prices. Type a price in a size group row, and it fills every color under that size. For the t-shirt, we entered 19 for S, M, and L, 21 for XL, and 23 for XXL.
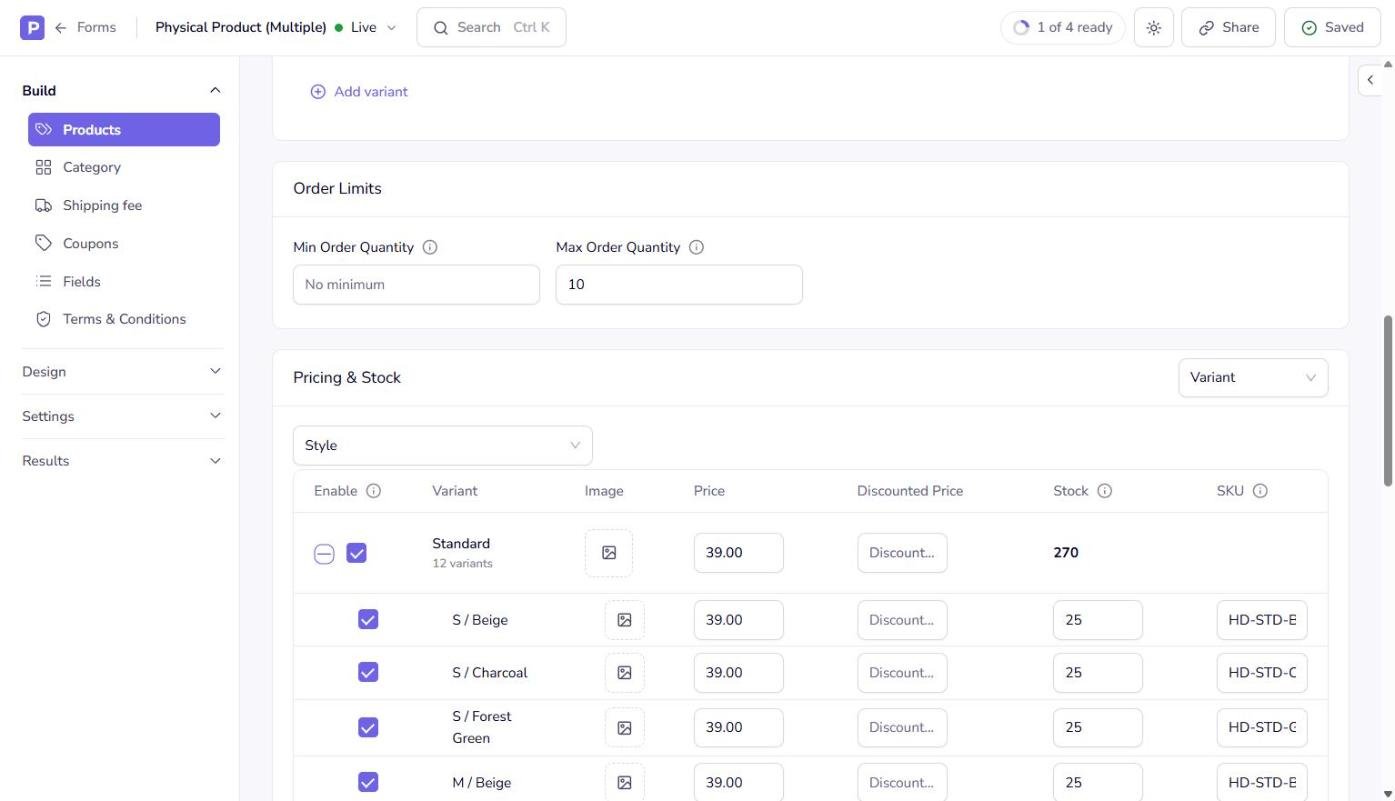
- Group by Style to set style-based prices. For the hoodie, we entered 39 for Standard and 49 for Premium. The sneakers got 59 for Basic and 79 for Performance.
- Group by Color to add images. Click the image icon on a color row, upload the photo, and PaymentForm.io applies it to all child variants of that color.
Click the + icon on a group to expand it and edit single combinations. Here you can add the Stock and SKU for each variant. Leave Stock blank for unlimited stock, or enter 0 to mark a variant as sold out. Uncheck Enable if you do not sell a certain combination.
Here is the hoodie grouped by Style. Every Standard variant is $39 and every Premium variant is $49, with stock and SKUs set per combination.
If you want to run a sale, add a lower amount in Discounted Price. The form will show the original price crossed out next to the sale price.
When everything looks right, click Create Product at the bottom of the page.
Step 11: Repeat for Your Other Products
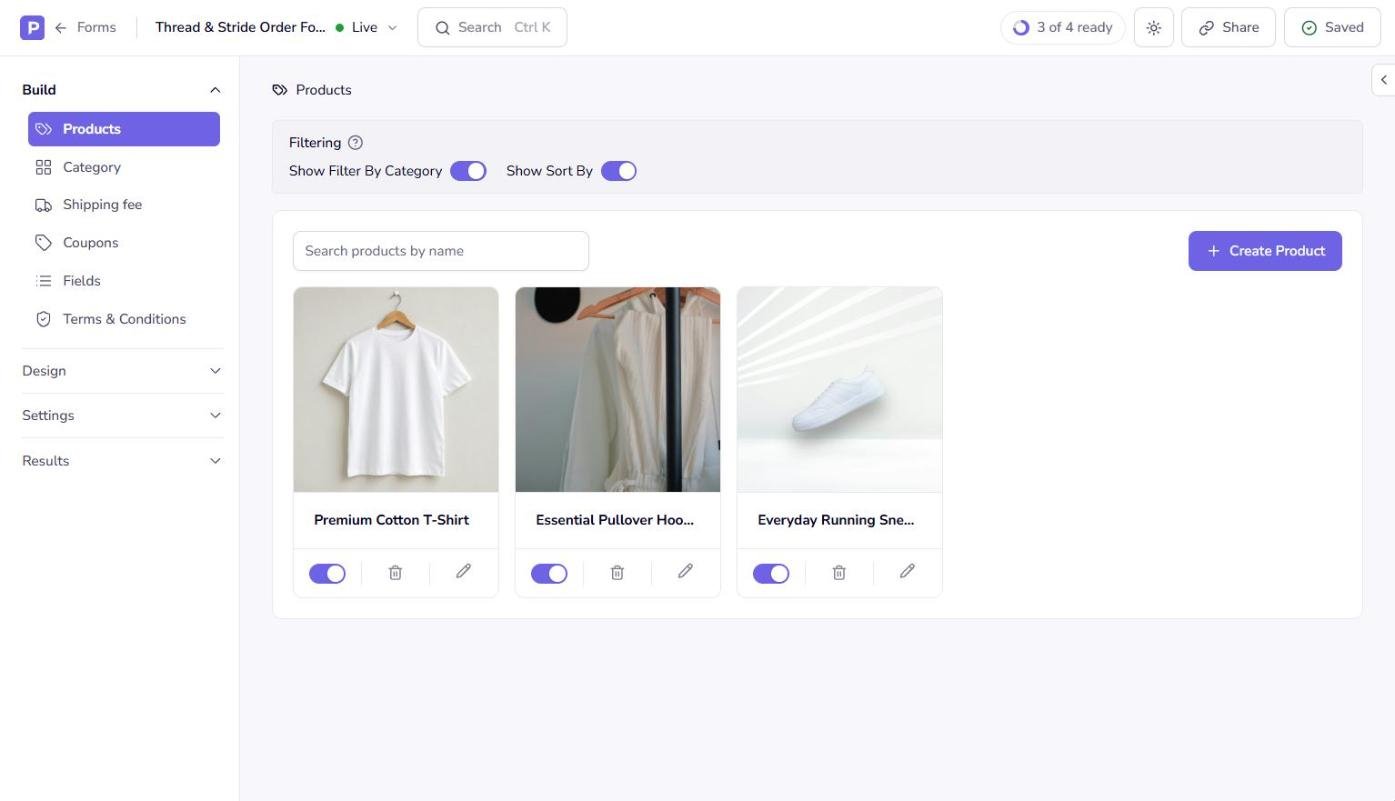
Go back to Products and repeat Steps 4 to 10 for each product. When you are done, all your products appear as cards in the Products list. You can turn a product off with its toggle, edit it with the pencil icon, or delete it with the trash icon.
Step 12: Add Shipping Options and Fees
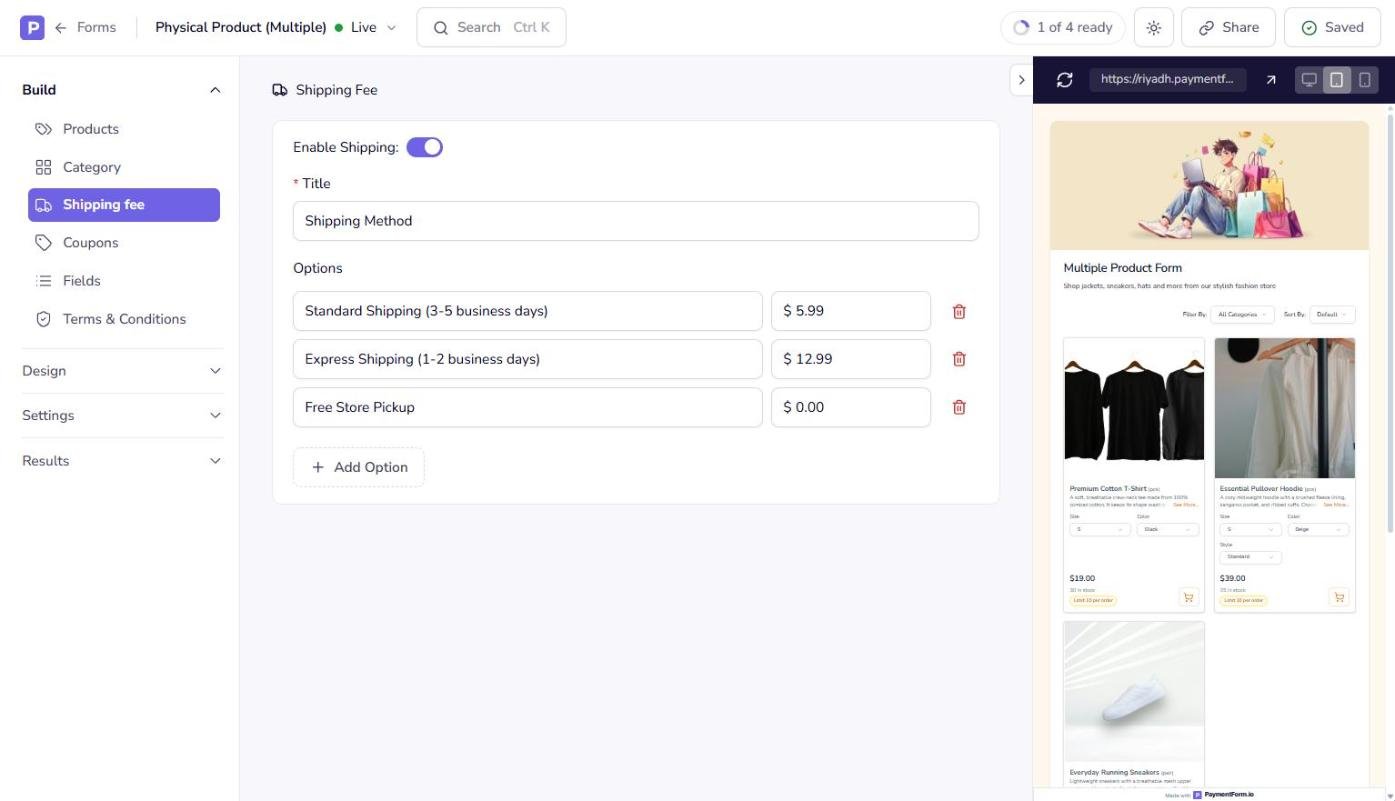
Go to Build > Shipping fee. Turn on Enable Shipping, then give the section a Title, such as Shipping Method.
Under Options, add each delivery method with its fee. Click Add Option to add more. We used:
- Standard Shipping (3-5 business days): $5.99
- Express Shipping (1-2 business days): $12.99
- Free Store Pickup: $0.00
Step 13: Set Up the Customer Information Fields
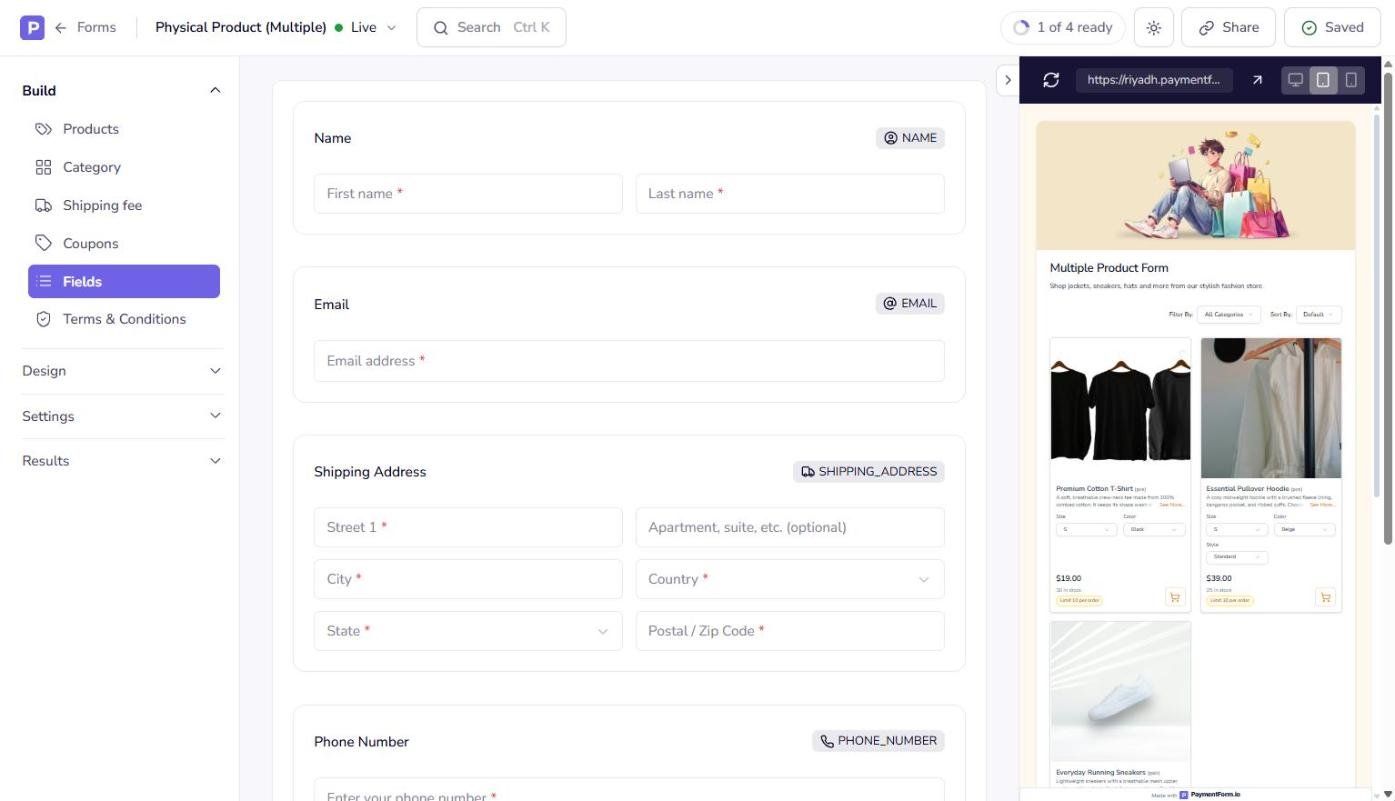
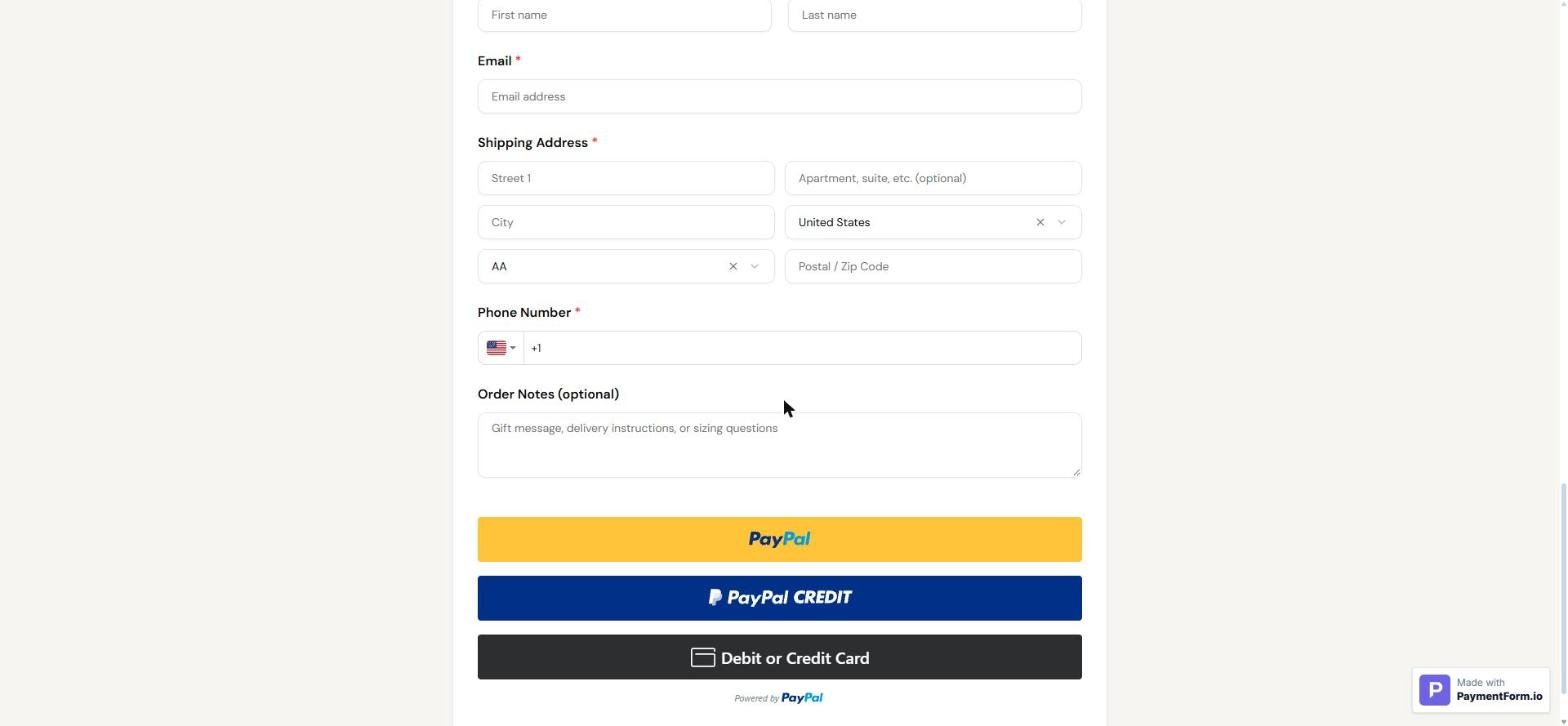
Go to Build > Fields. The template already includes Name, Email, and Shipping Address, which covers most physical orders.
To add more fields, click Add Field and pick a field type. We added a Phone Number field and a Multiline Text field for order notes. Hover over a field and click the pencil icon to rename it. Click the gear icon to open its settings, where you can change the placeholder or untick Required to make it optional.
Step 14: Improve the Form Appearance
A few design changes make the form feel like a real store:
- Go to Settings > Form Settings to upload a Header Image and edit the Description. This is the title and short intro buyers see above your products.
- Go to Design > Theme to change the Font Family, Background, and Accent Color. We used a soft off-white background with a navy accent so the product photos stand out.
Use the desktop, tablet, and mobile icons at the top of the preview panel to check how the form looks on each screen size. When you make changes, click Save changes in the top-right corner.
Step 15: Connect and Select a Payment Gateway
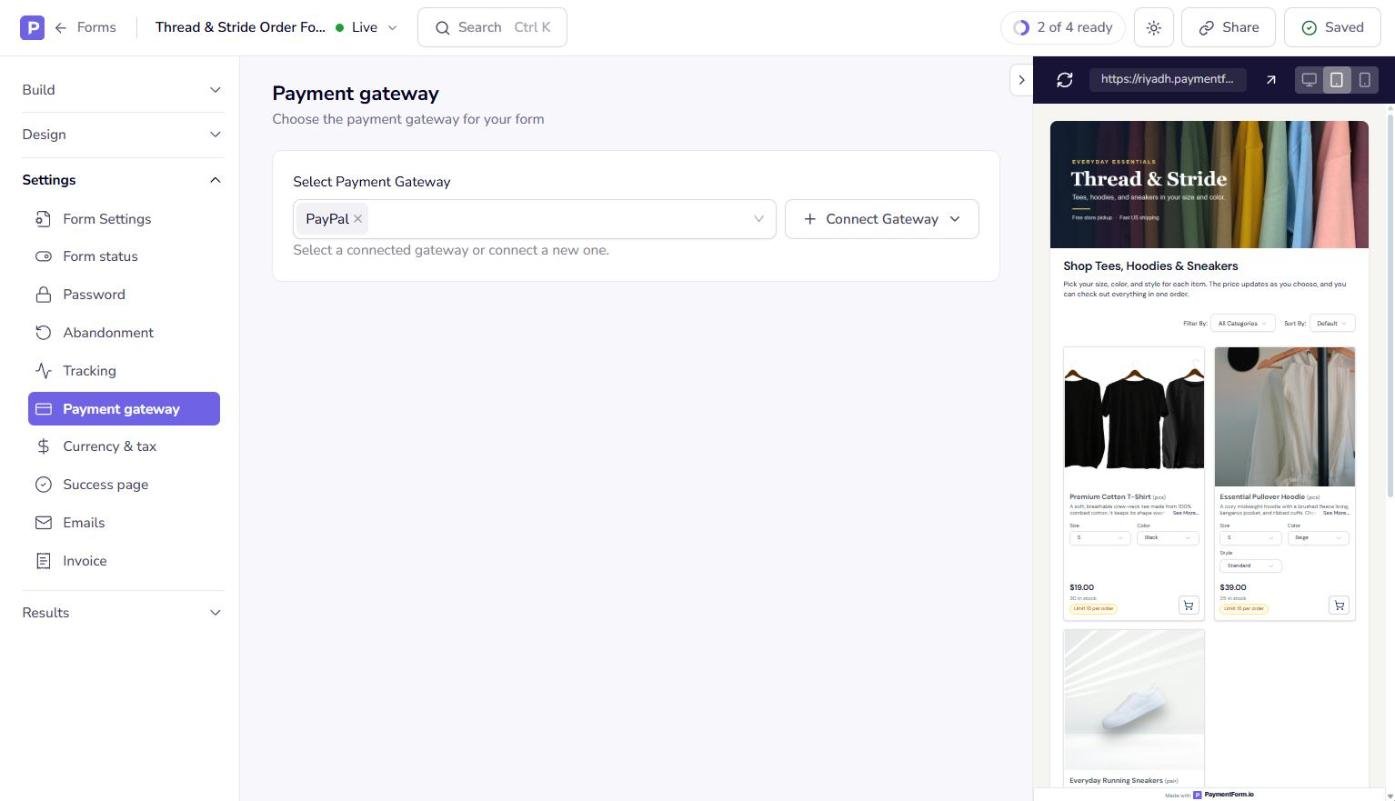
Go to Settings > Payment gateway. Open the Select Payment Gateway dropdown and choose a gateway you have already connected. We selected PayPal.
If you have not connected a gateway yet, click Connect Gateway and follow the sign-in steps for your provider. You can also manage gateways anytime from Payment Gateway in the main dashboard menu. Make sure the gateway supports the currency you plan to use.
Step 16: Set the Currency and Optional Tax
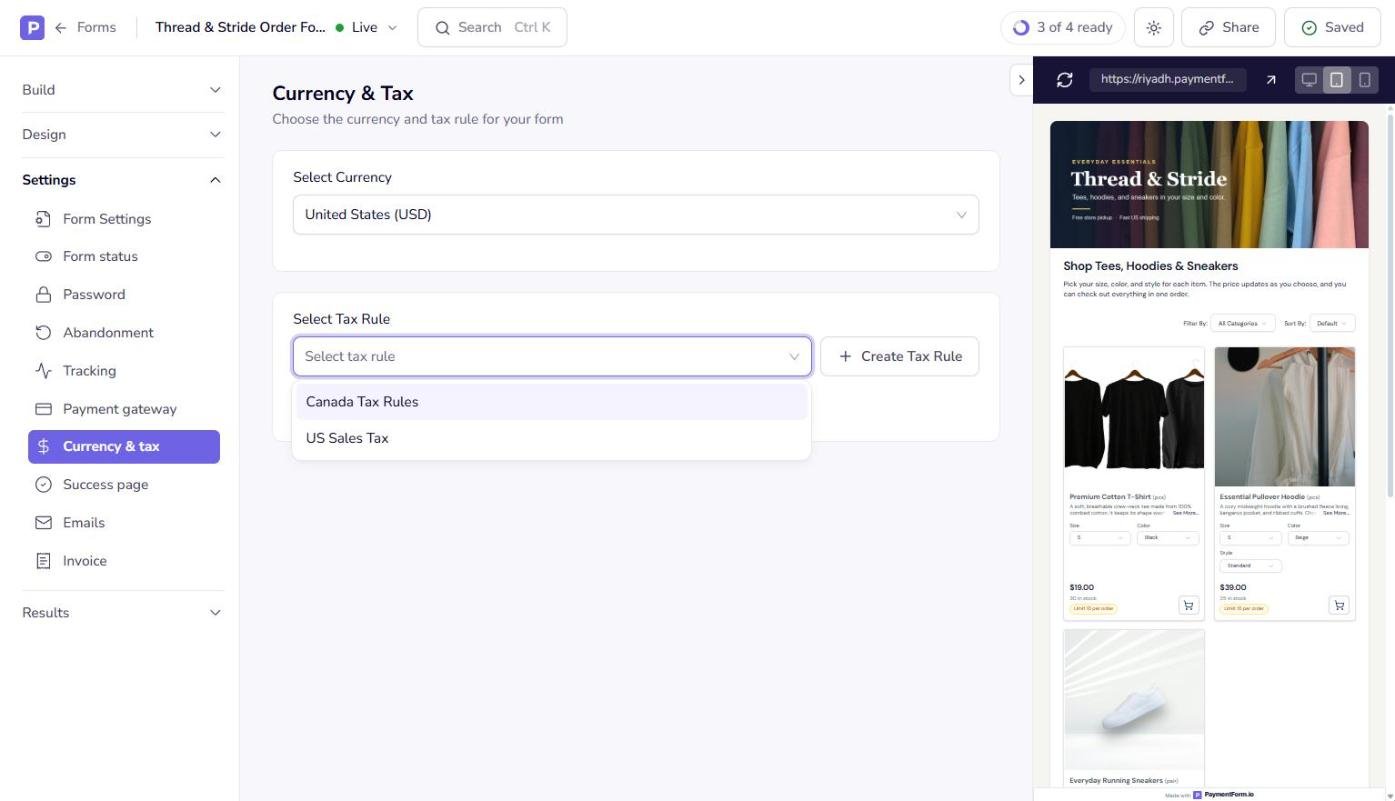
Go to Settings > Currency & tax. Under Select Currency, choose United States (USD) or the currency you sell in.
Tax is optional. If you need to charge sales tax, choose a rule from Select Tax Rule, or click Create Tax Rule to make one. Tax rules live in the Tax menu of the main dashboard, so you can reuse them across forms. If you do not charge tax, simply leave this field empty. PaymentForm.io calculates tax on the form, but it does not file or pay taxes for you.
Step 17: Set Up the Order Confirmation
Go to Settings > Success page and write the message buyers see after they pay. A short thank-you note and a line about shipping times is enough.
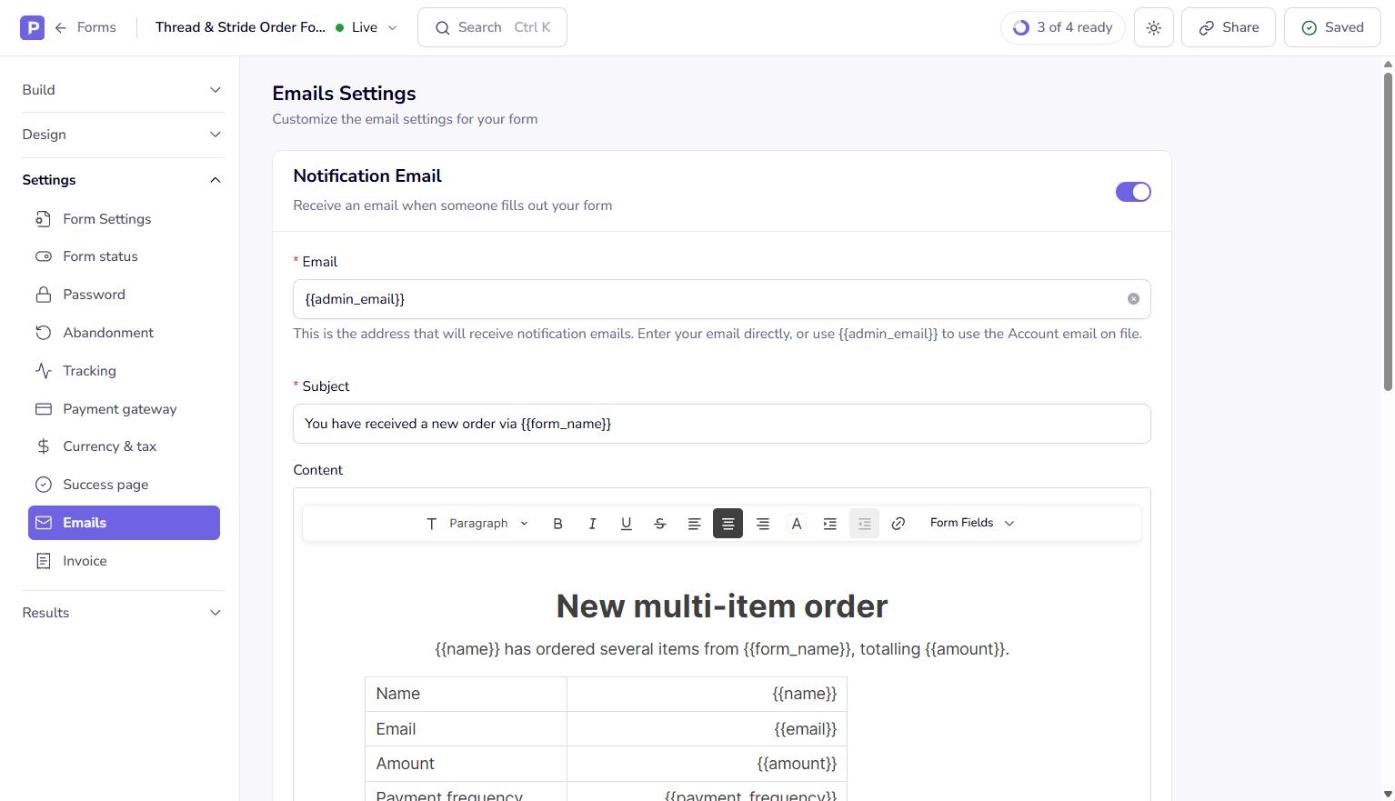
Then open Settings > Emails. The Notification Email tells you when a new order arrives, and the Autoresponder Email sends the buyer an order confirmation. Both come with ready-made content, and you can edit the subject and message with form variables such as {{name}} and {{amount}}.
Step 18: Preview and Test the Order Form
Open the form link (you will find it in the next step) and test it like a buyer would. Change the size, color, and style on each product and check that the price, stock, and image update correctly.
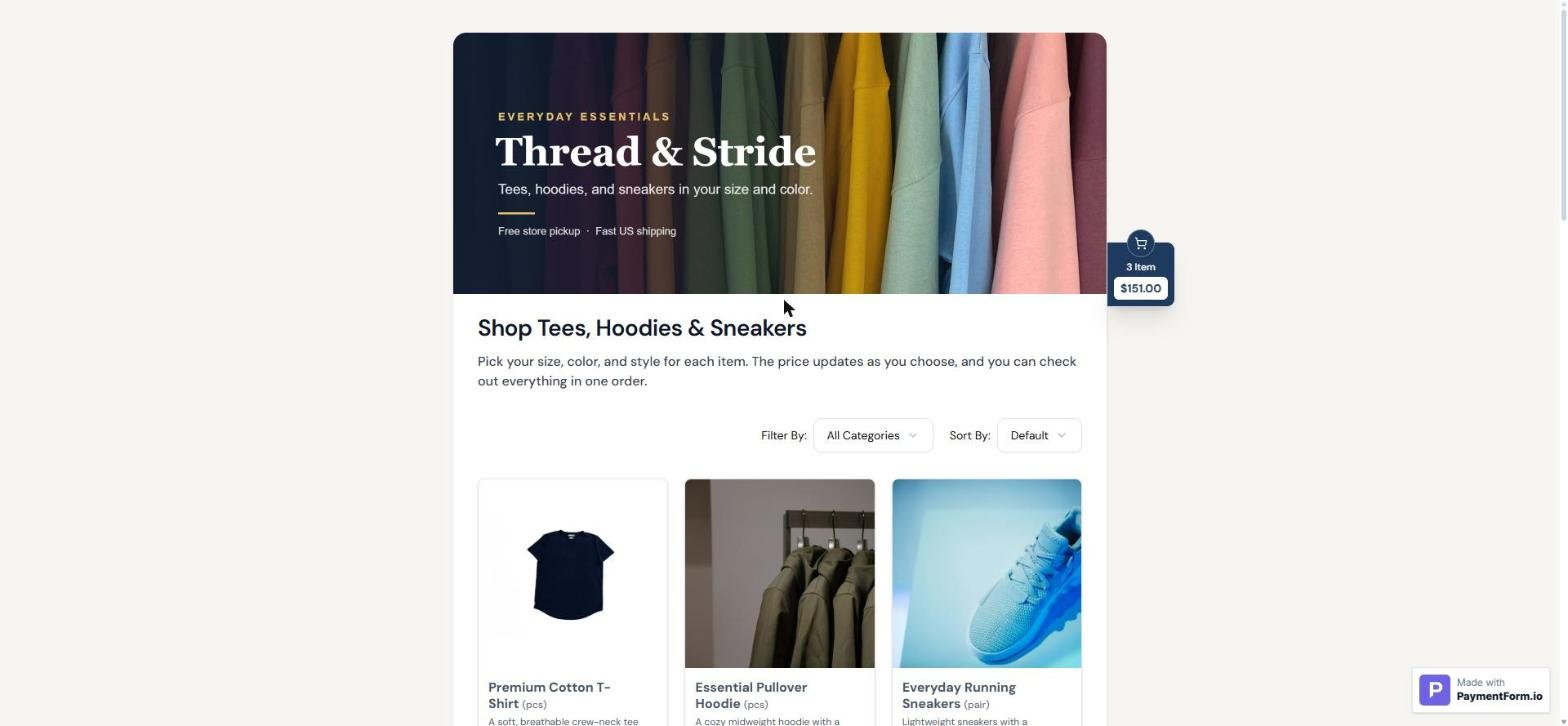
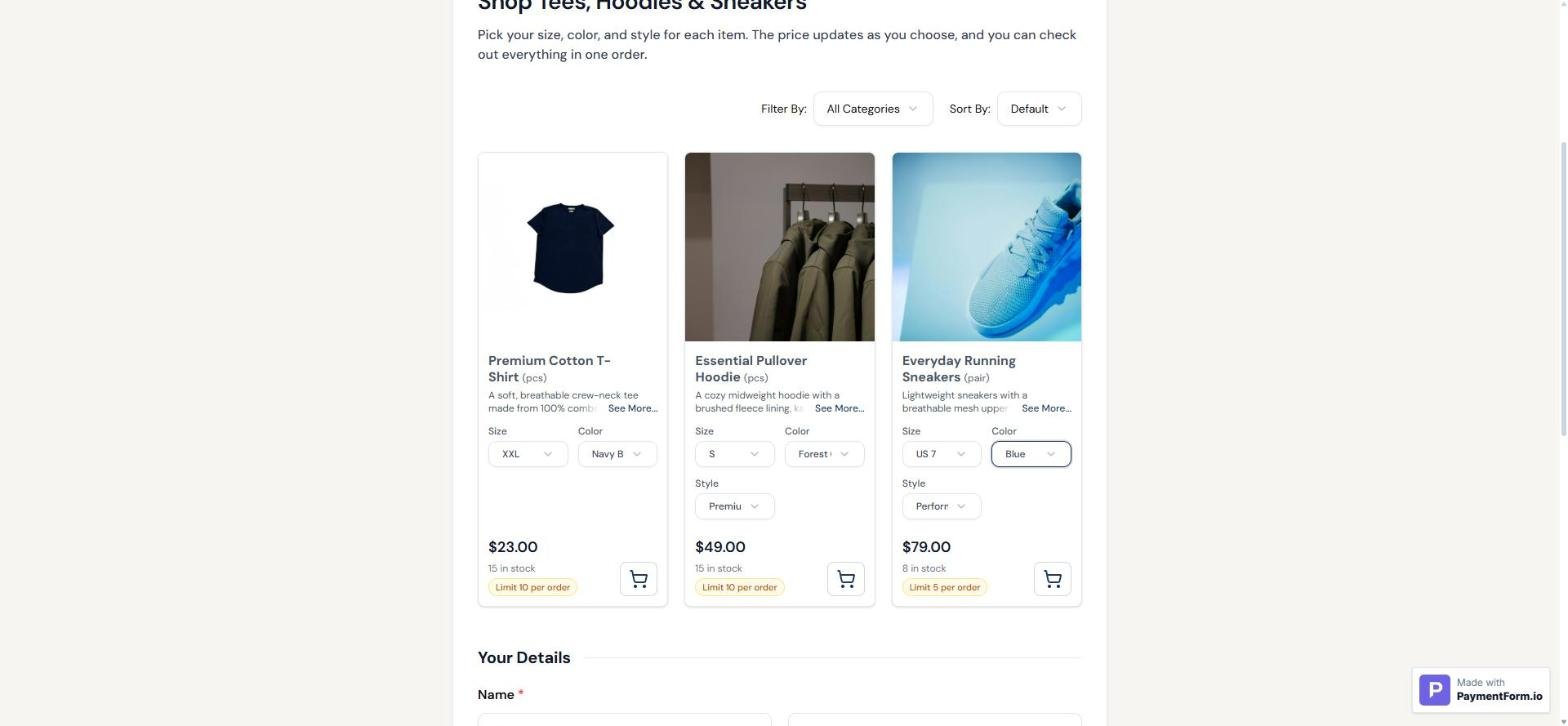
In our test, the navy t-shirt in XXL showed $23, the Premium hoodie showed $49, and the Performance sneakers showed $79.
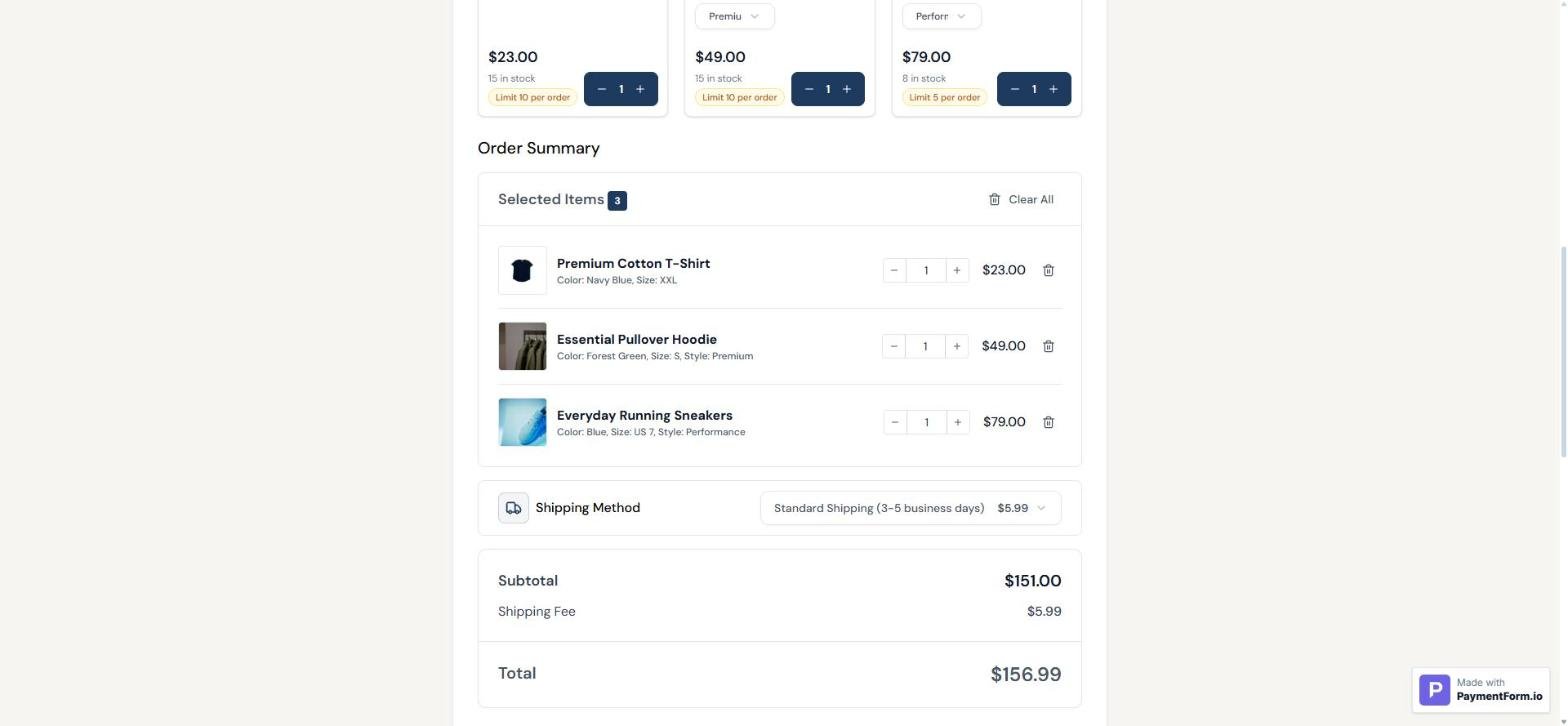
Add a few items to the cart and scroll to the Order Summary. It lists each item with its chosen options, quantity, and price, followed by the shipping method, subtotal, and total.
Below the summary, buyers fill in their details and pay with the gateway you selected. Do not complete a real payment while testing unless you plan to refund it.
Step 19: Share and Publish Your Order Form
Click Share at the top of the editor. Here you can:
- Copy the Share Link or click Open in New Tab. Click the pencil icon to change the URL slug, then click Apply.
- Copy the Embed Code to place the form on your website.
- Limit embedding to your own domains under Where this form can be embedded.
- Click Refresh form cache if visitors still see an older version.
- Share directly to Facebook, LinkedIn, WhatsApp, or X.
- Click Generate QR Code for flyers, packaging, or pop-up stalls.
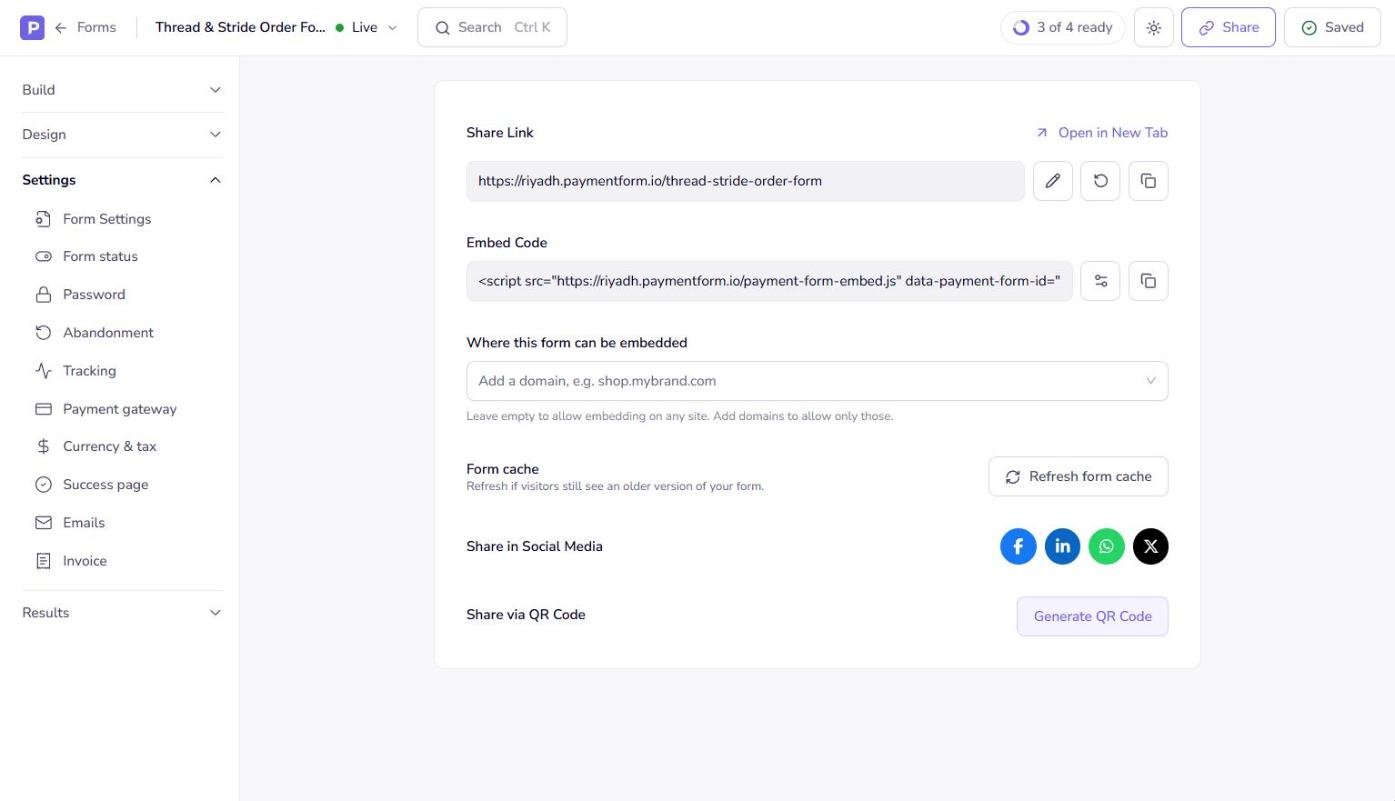
Make sure the form status shows Live next to the form name. Once it is live and shared, every order appears under Results > Responses.
Conclusion
Adding product sizes, colors, and different prices to an order form does not need a full online store. With the Physical Product (Multiple) module, you create each product once, add its variants, and set prices by size, color, or style in one table. Buyers see the right price for their choice and pay for everything in a single checkout.
Start with one product and two variants, test the form, then add the rest of your catalog. When you are ready, create your own order form with PaymentForm.io and share the link with your customers.